XCode: 7 Steps to Easily Switch Between Multiple Environments
— posted on February 4, 2015 10:13 AM
Share this to
 During development process, we usually have to work on a multiple environments namely; staging and production. These environments tend to have a few different parameters such as the server hostname, Bundle ID and third-party app API keys to name a few.
Previously, I tend to switch between this environments manually. Means, I manually replace the server URL parameters, API key, app bundle ID, well you got the idea. Repeating this task whenever you want to change between environments is quite time - consuming, error - prone and repetitive. To sums up, it's problematic and unnecessary.
This guide will explain the method that I have been using to solve this problem and painlessly switch between different build environments.
We will use Xcode Scheme, Build Configuration and Build Settings to manage different builds; staging, production and App Store builds.
To make this guide easy to follow, I will start with a new project. If you already have an existing project, you can directly skip to step 2.
During development process, we usually have to work on a multiple environments namely; staging and production. These environments tend to have a few different parameters such as the server hostname, Bundle ID and third-party app API keys to name a few.
Previously, I tend to switch between this environments manually. Means, I manually replace the server URL parameters, API key, app bundle ID, well you got the idea. Repeating this task whenever you want to change between environments is quite time - consuming, error - prone and repetitive. To sums up, it's problematic and unnecessary.
This guide will explain the method that I have been using to solve this problem and painlessly switch between different build environments.
We will use Xcode Scheme, Build Configuration and Build Settings to manage different builds; staging, production and App Store builds.
To make this guide easy to follow, I will start with a new project. If you already have an existing project, you can directly skip to step 2.
Step 1: Create a new project
When starting out a new project, fill in the empty fields with your project details eg.Product Name: Your project name
Organization Name: Your organization name (Can be left blank)
Organization Identifier: com.company
[caption id="attachment_5999" align="aligncenter" width="1454"]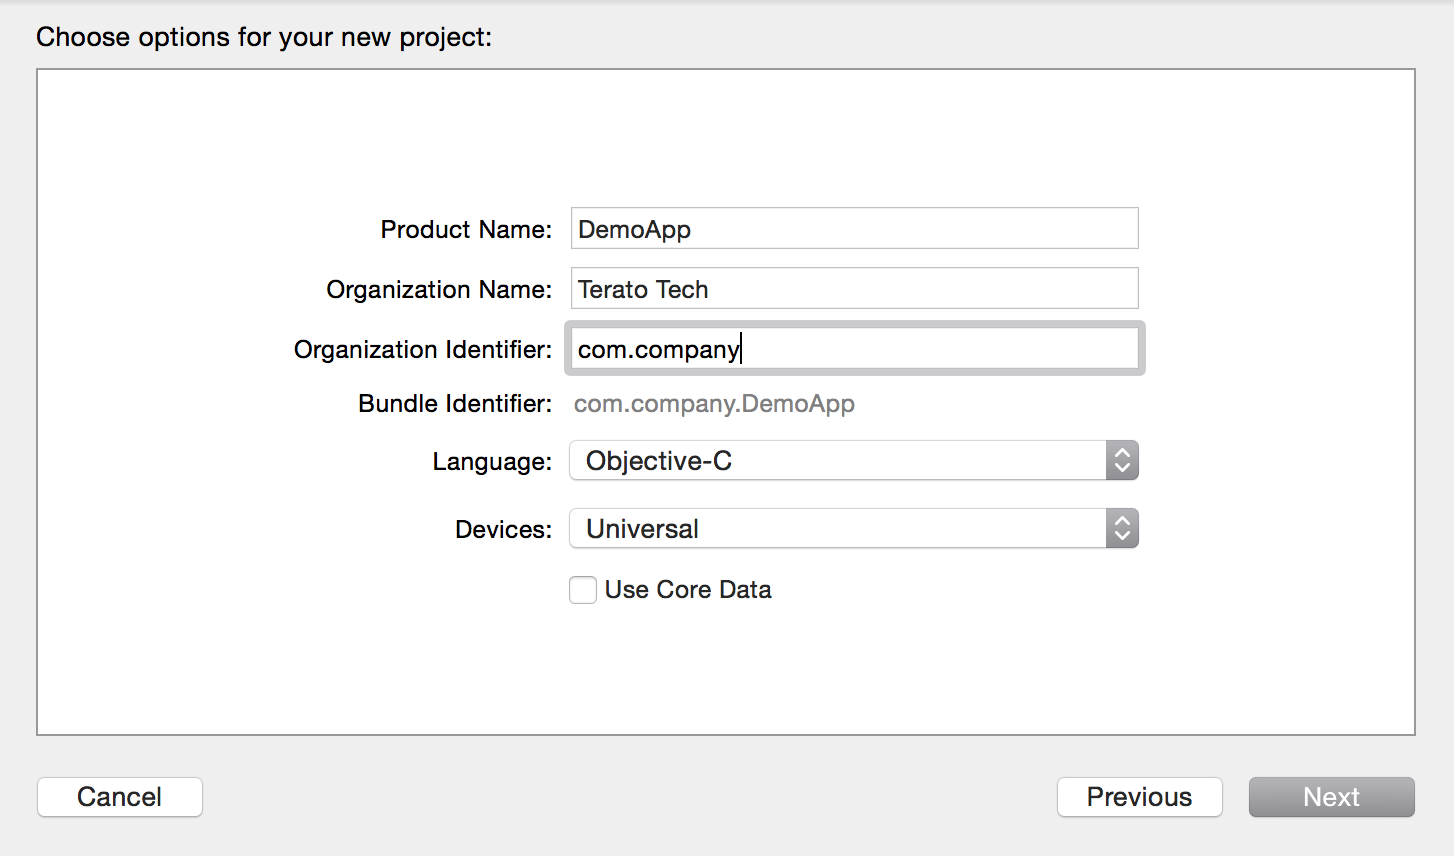 Create a new project[/caption]
Click
Create a new project[/caption]
Click Next . Choose your project location and click Create. Xcode will then set up your new project and open the editor for you.
Step 2: Create Build Configurations
Firstly, navigate to your project info. And find theConfigurations section. Your Configurations option will have a Debug option and Release option inside.
[caption id="attachment_6005" align="aligncenter" width="1842"]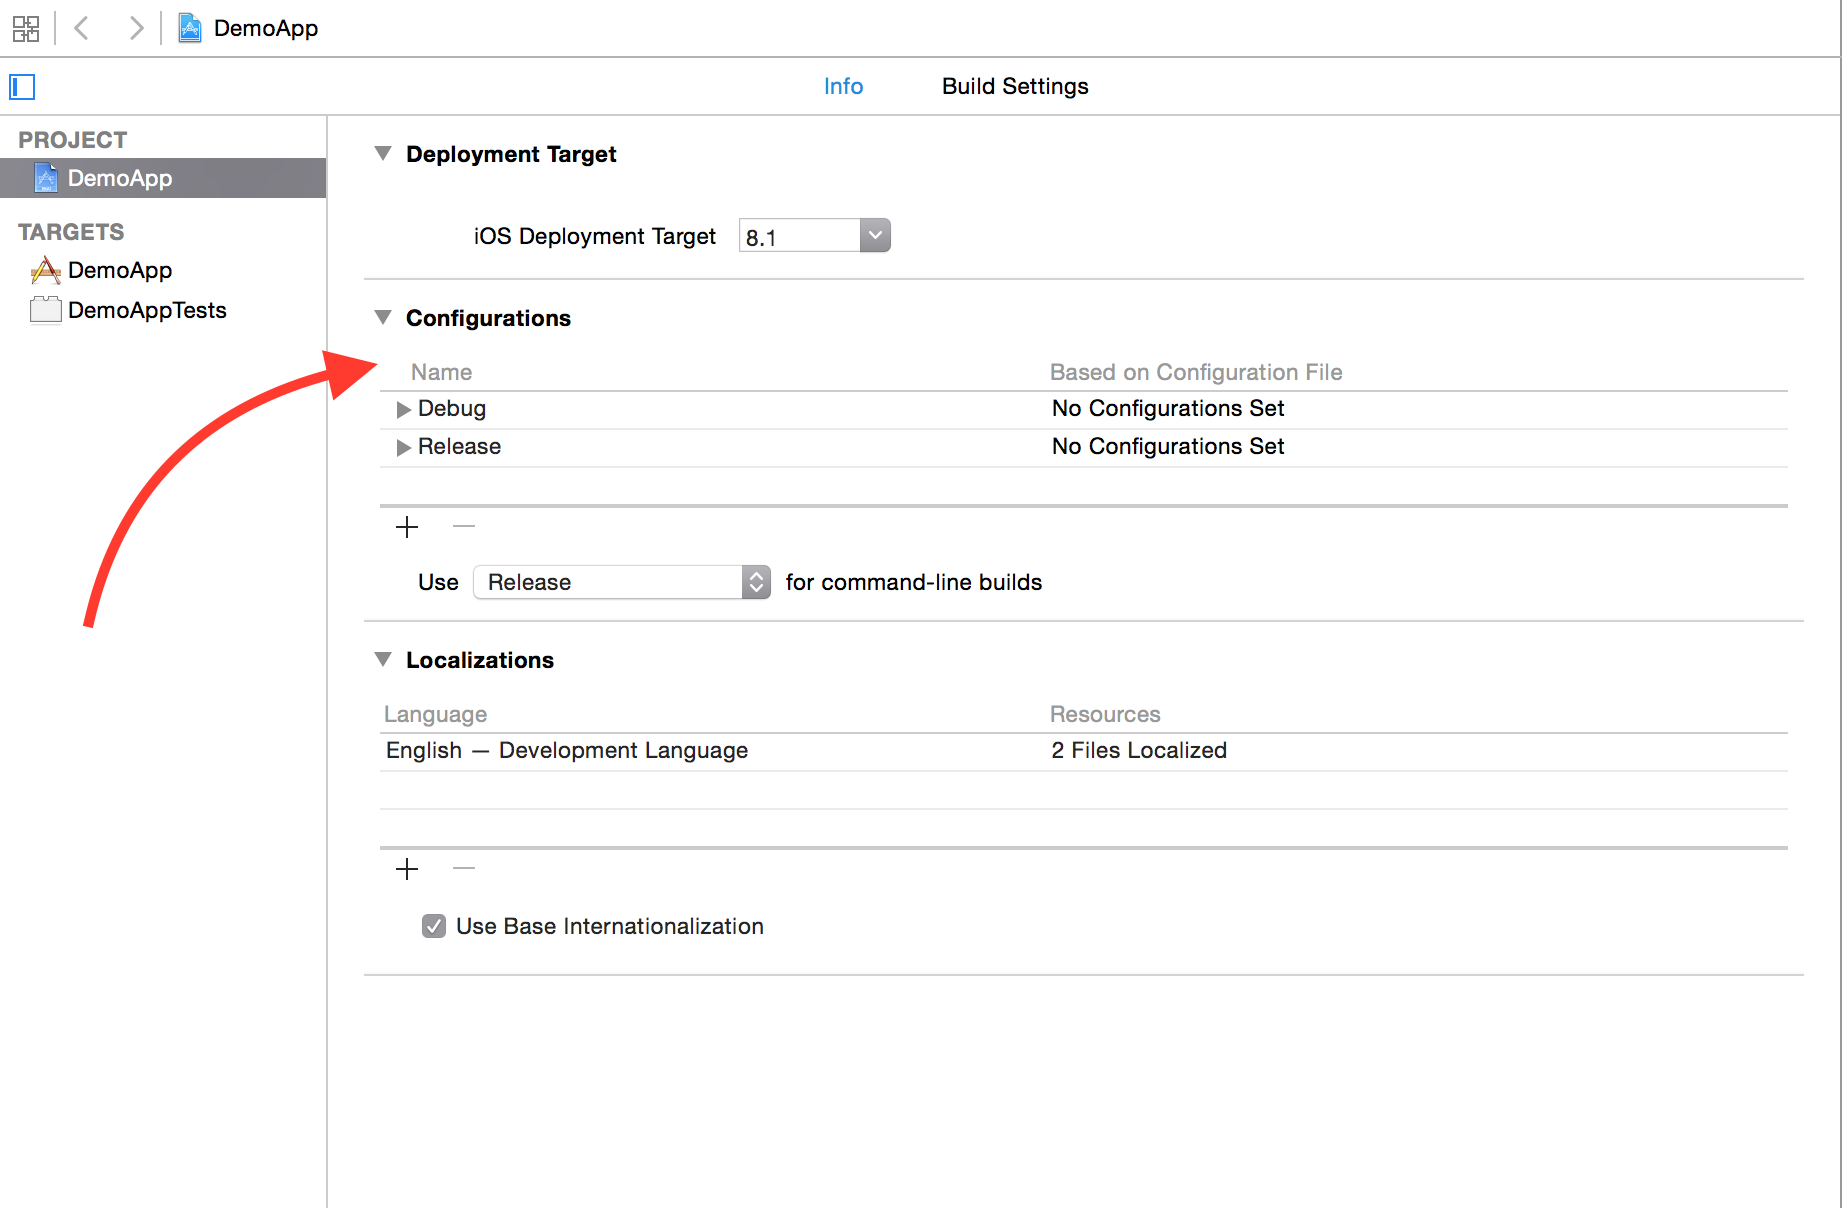 Look for the Configurations section[/caption]
Then, click on the Add button (+) and select the
Look for the Configurations section[/caption]
Then, click on the Add button (+) and select the duplicate the "Debug" configuration to create a new configuration.
[caption id="attachment_6008" align="aligncenter" width="1588"]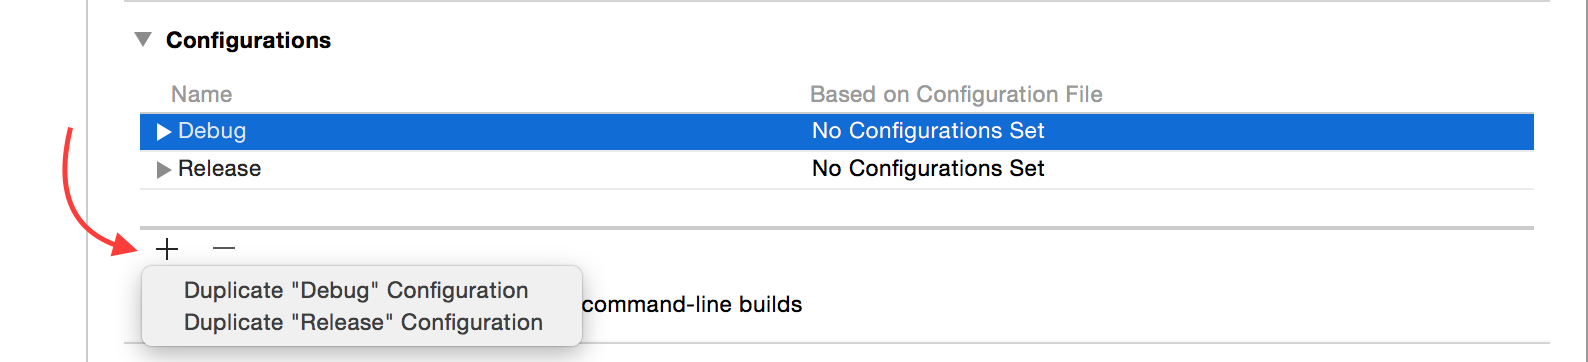 Click on the (+) button and duplicate the configuration[/caption]
Rename the newly created configuration to Debug Staging by double clicking the configuration name.
[caption id="attachment_6010" align="aligncenter" width="1604"]
Click on the (+) button and duplicate the configuration[/caption]
Rename the newly created configuration to Debug Staging by double clicking the configuration name.
[caption id="attachment_6010" align="aligncenter" width="1604"]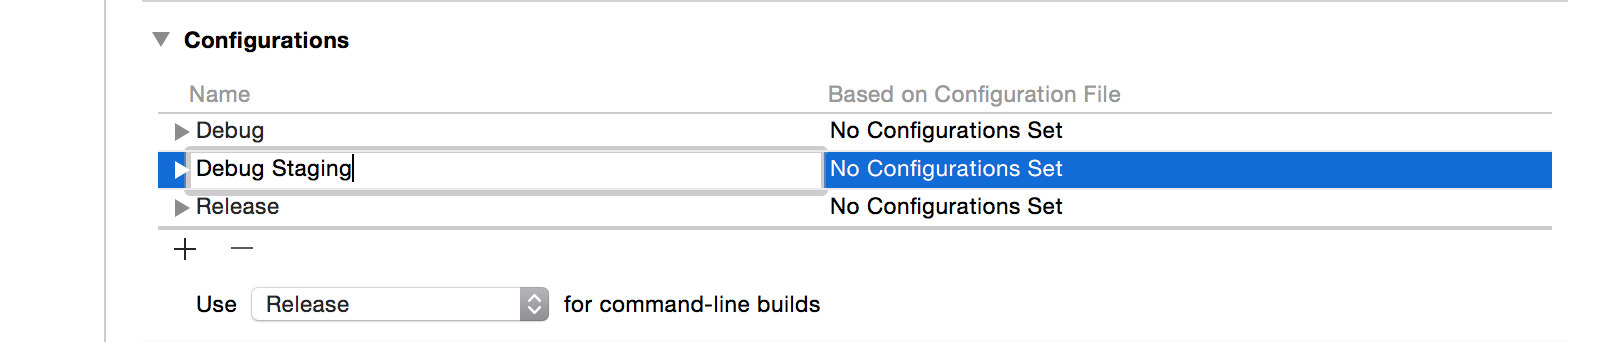 Rename the duplicated configuration.[/caption]
Proceed this method to create 2 more different builds; Release Staging and App Store by duplicating the Release configuration.
As a result, we will have 5 different build configurations; Debug, Debug Staging, Release, Release Staging and App Store.
[caption id="attachment_6011" align="aligncenter" width="1506"]
Rename the duplicated configuration.[/caption]
Proceed this method to create 2 more different builds; Release Staging and App Store by duplicating the Release configuration.
As a result, we will have 5 different build configurations; Debug, Debug Staging, Release, Release Staging and App Store.
[caption id="attachment_6011" align="aligncenter" width="1506"]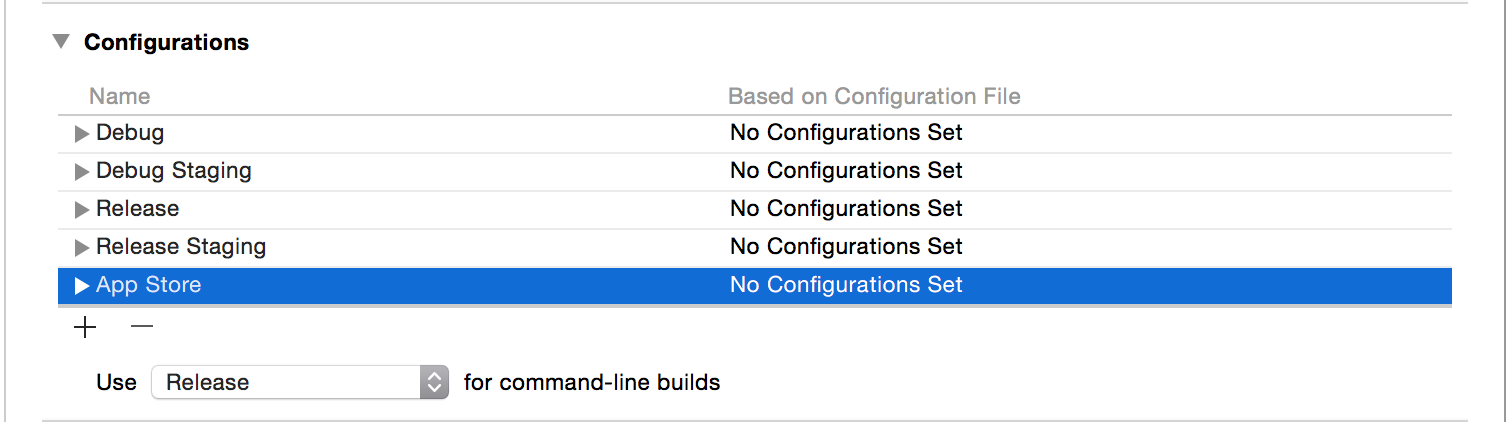 5 Different build configurations[/caption]
Step 3: Create User-defined Build Settings
Typically, we will create a user-defined settings for Bundle ID, app icon names, Facebook App ID, etc. So we will be able to assign different Bundle ID, icon names or Facebook App ID for different Build Configurations. To do so, navigate to project build settings, click on the Add button(+) and add User-defined Setting. In this example, I create 3 different user-defined setting;BUNDLE_ID, NAME_SUFFIX and FB_APP_ID.
[caption id="attachment_6013" align="aligncenter" width="1830"]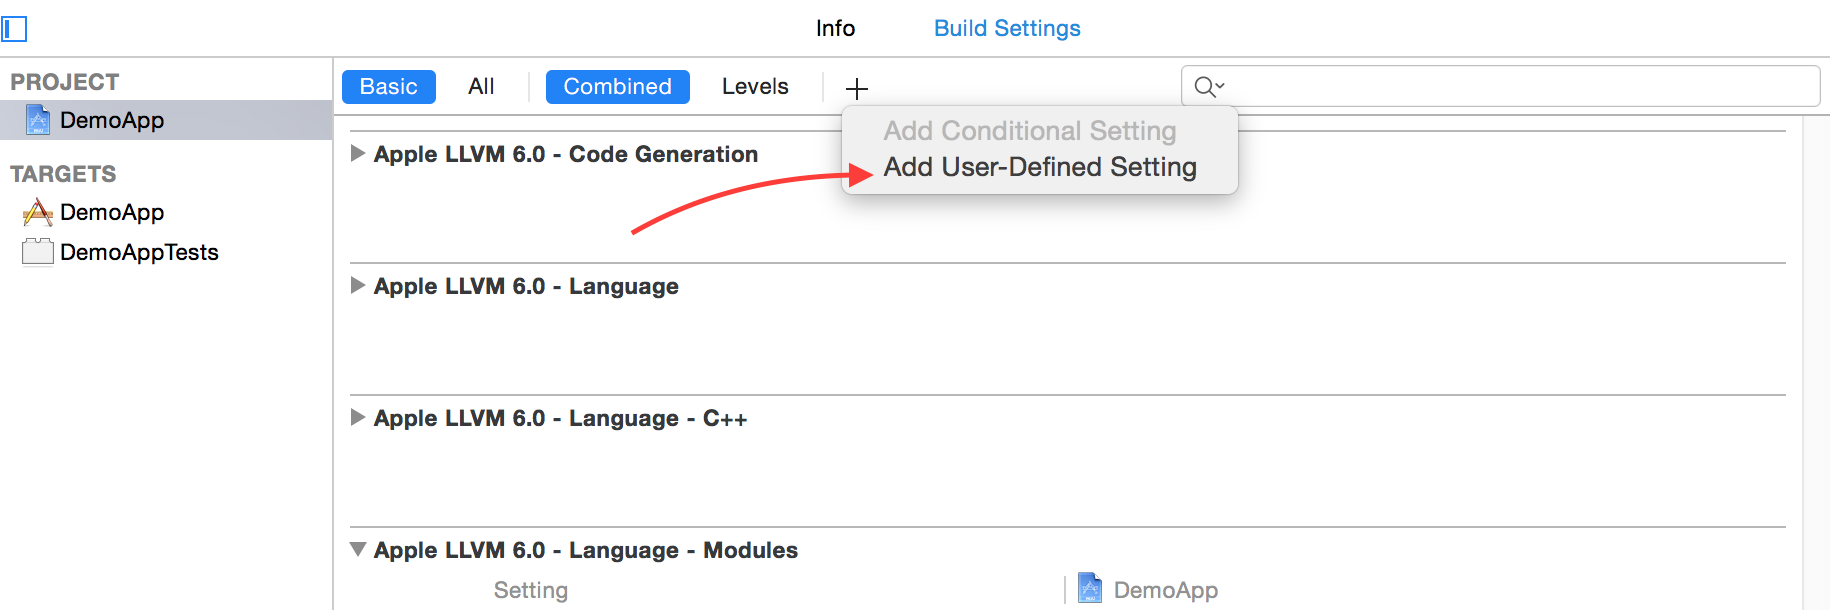 Create a User-Defined setting.[/caption]
After adding the new user-defined settings, edit the build configurations value inside each of the settings as you can see in the image below.
[caption id="attachment_6014" align="aligncenter" width="1806"]
Create a User-Defined setting.[/caption]
After adding the new user-defined settings, edit the build configurations value inside each of the settings as you can see in the image below.
[caption id="attachment_6014" align="aligncenter" width="1806"]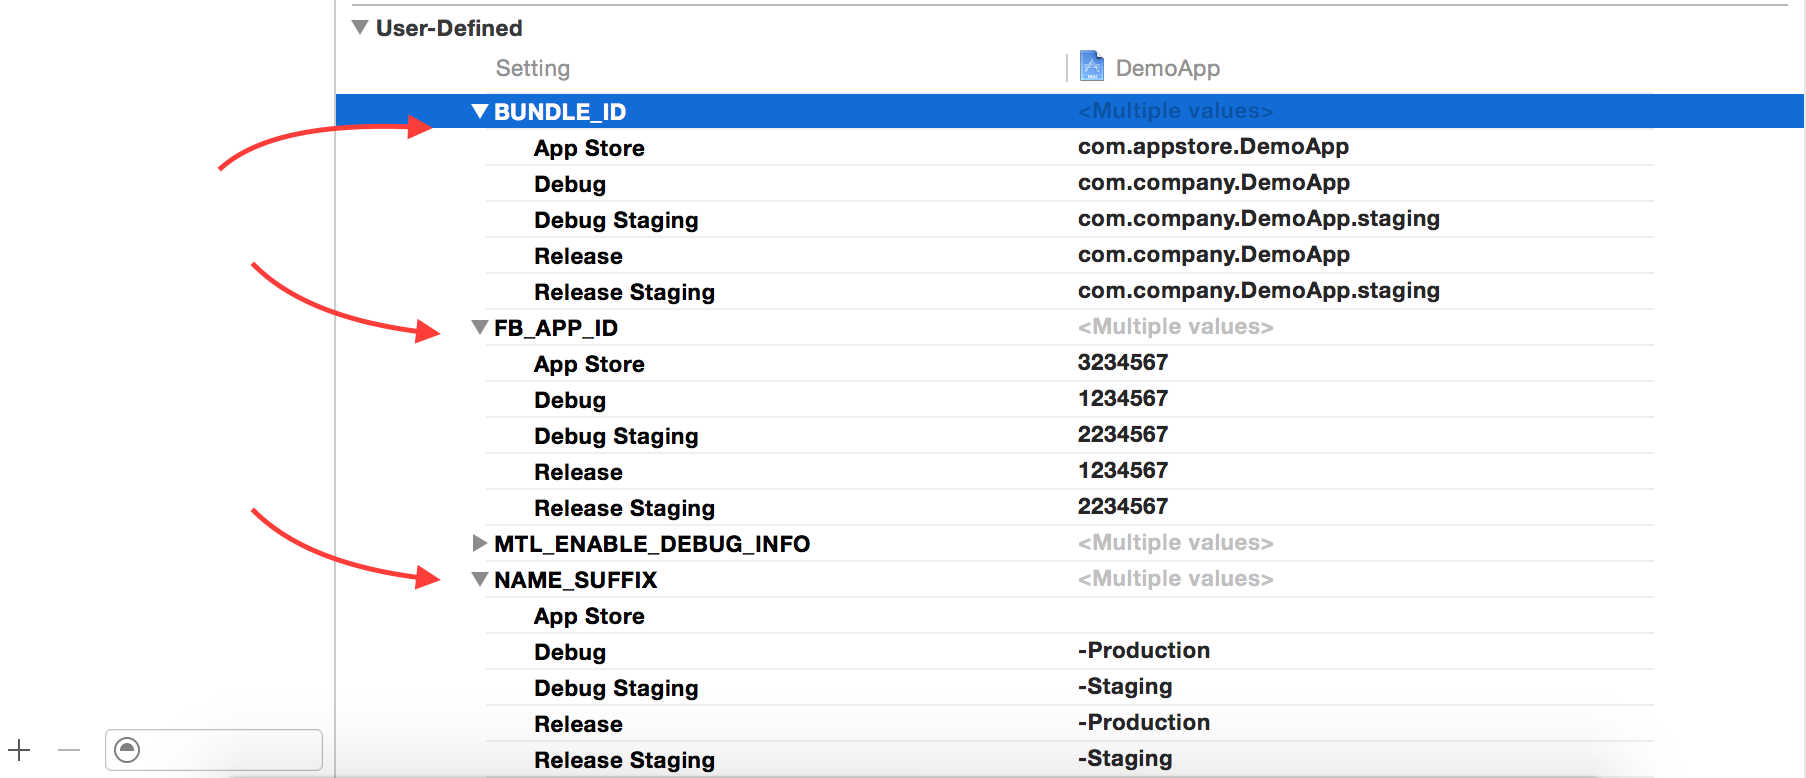 Edit the configurations value[/caption]
Step 4: Modify Info.plist file
All the user-defined settings defined in the previous step will be used in the project'sinfo.plist. Make sure you have done all the previous steps before proceeding.
Modify your info.plist by inserting the value defined in user-defined settings. So, for example if you define BUNDLE_ID in user-defined settings, modify your bundle identifier in info.plist with $(BUNDLE_ID).
Bundle Identifier : $(BUNDLE_ID)
Bundle display name: Demo App $(NAME_SUFFIX)
FacebookAppID: $(FB_APP_ID)
If your project's info.plist is missing some of the fields, simply add a new one.
[caption id="attachment_6016" align="aligncenter" width="1840"]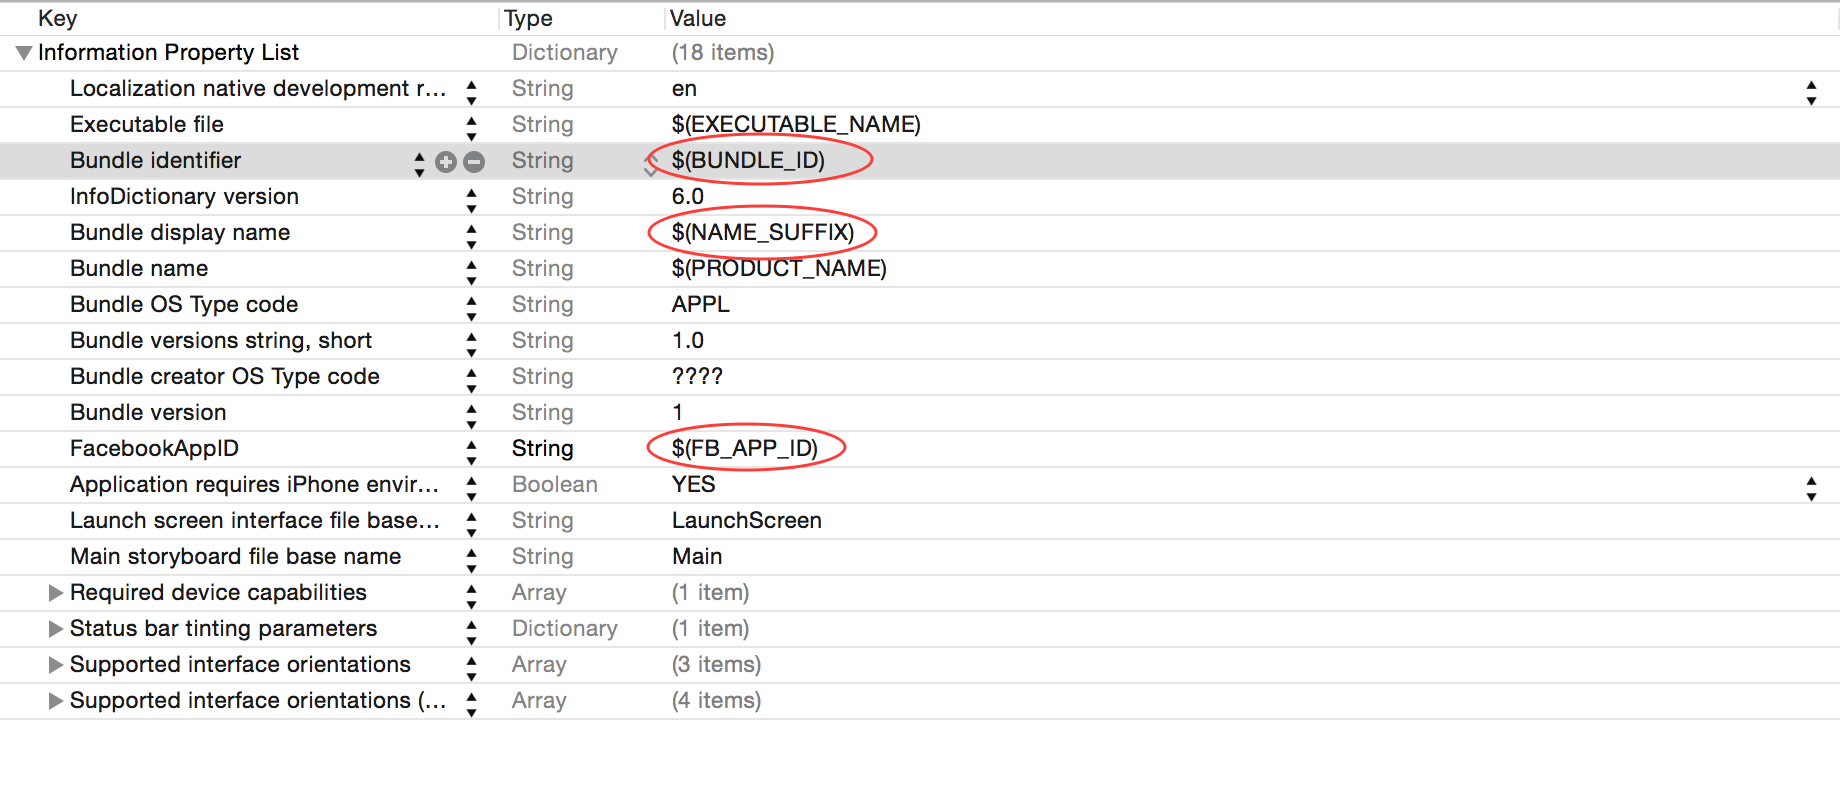 Modify info.plist with the user-defined settings.[/caption]
Step 5: Create Schemes with Build Configurations
Each of our app builds needs one Scheme, so we will create 3 Schemes; DemoAppStaging, DemoAppProduction and DemoAppStore, for staging build, production build and App Store build respectively. Click on your project active scheme located on top left of the editor and click on "manage scheme". Refer the image below if you can't find it. [caption id="attachment_6018" align="aligncenter" width="962"]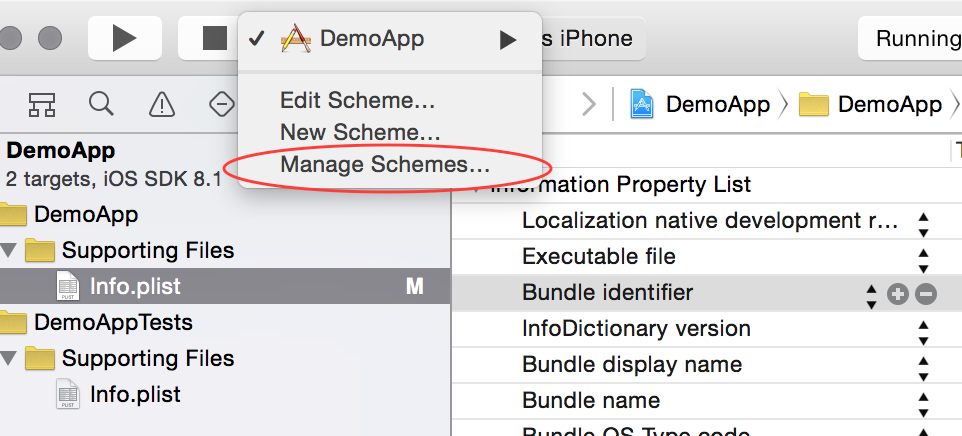 Click on the "Manage Schemes" option[/caption]
Then, create a new scheme named DemoAppStaging.
[caption id="attachment_6019" align="aligncenter" width="1530"]
Click on the "Manage Schemes" option[/caption]
Then, create a new scheme named DemoAppStaging.
[caption id="attachment_6019" align="aligncenter" width="1530"]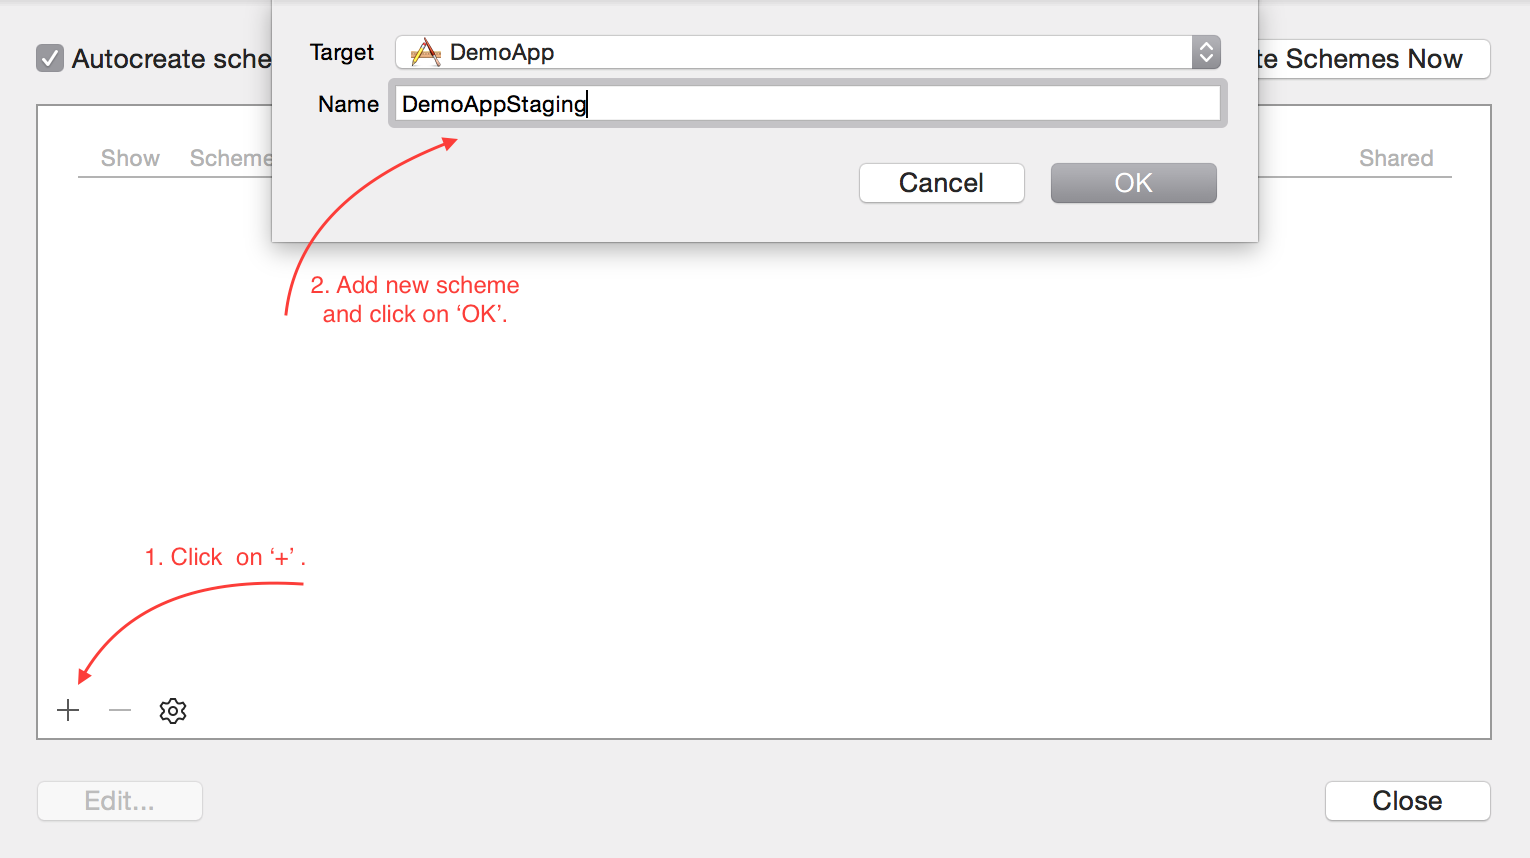 Steps to create a new scheme[/caption]
Proceed this step for each DemoAppProduction and DemoAppAppStore. Make sure that you check the
Steps to create a new scheme[/caption]
Proceed this step for each DemoAppProduction and DemoAppAppStore. Make sure that you check the Shared option so that these changes are added on Git repository.
[caption id="attachment_6020" align="aligncenter" width="1450"]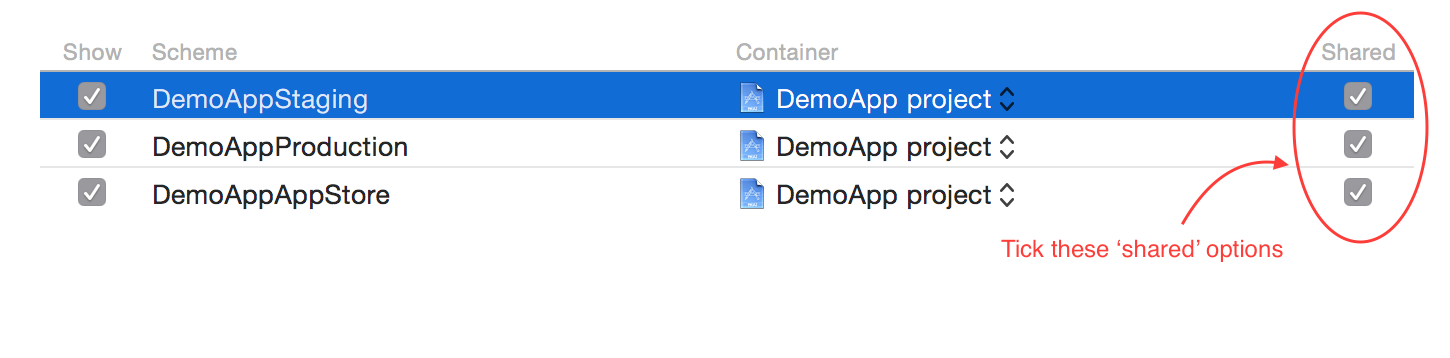 Make sure to tick on the "Shared" option for each scheme.[/caption]
Step 6: Edit Schemes
Then, edit the schemes based on the build configurations. For example, DemoAppStaging use Debug Staging and Release Staging Build configurations. Make sure that you have edit each of the build configurations forBuild, Run, Test, Profile, Analyze and Archive.
[caption id="attachment_6021" align="aligncenter" width="1788"]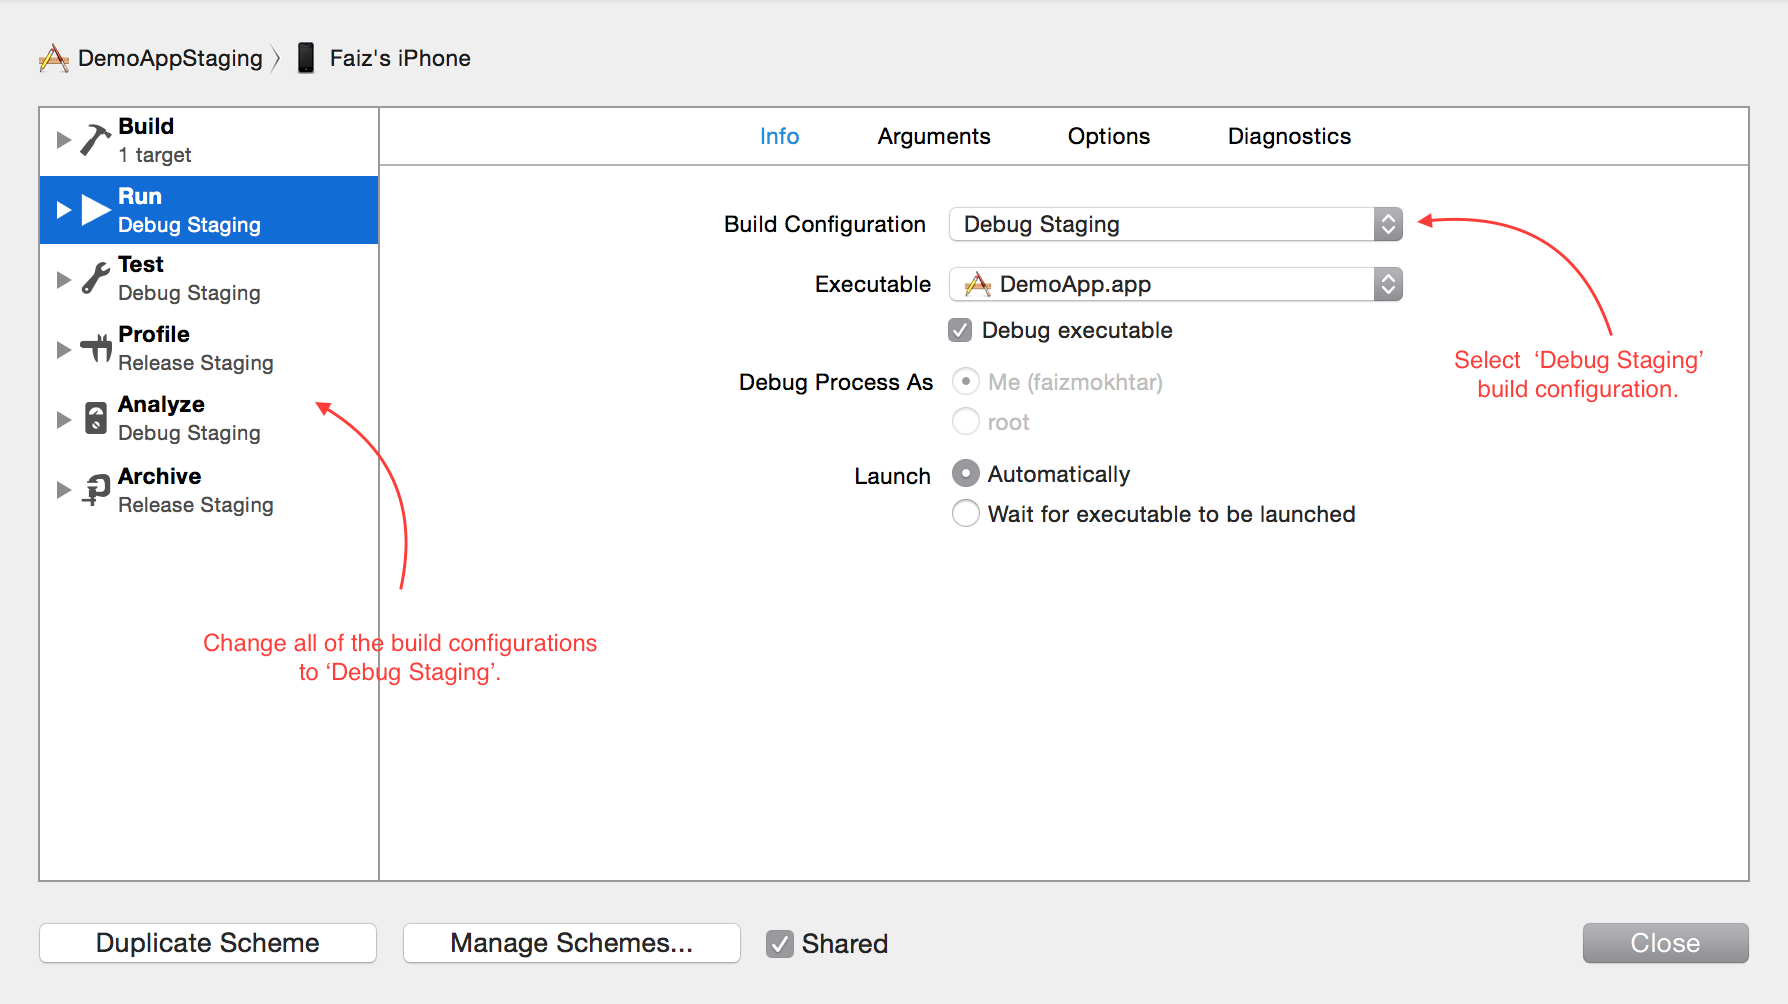 Edit the schemes properly.[/caption]
Edit each schemes based on the following configurations specified in the table below.
Edit the schemes properly.[/caption]
Edit each schemes based on the following configurations specified in the table below.
| Schemes | Configurations |
|---|---|
| DemoAppStaging | Debug Staging |
| Release Staging | |
| DemoAppProduction | Debug |
| Release | |
| DemoAppStore | App Store |
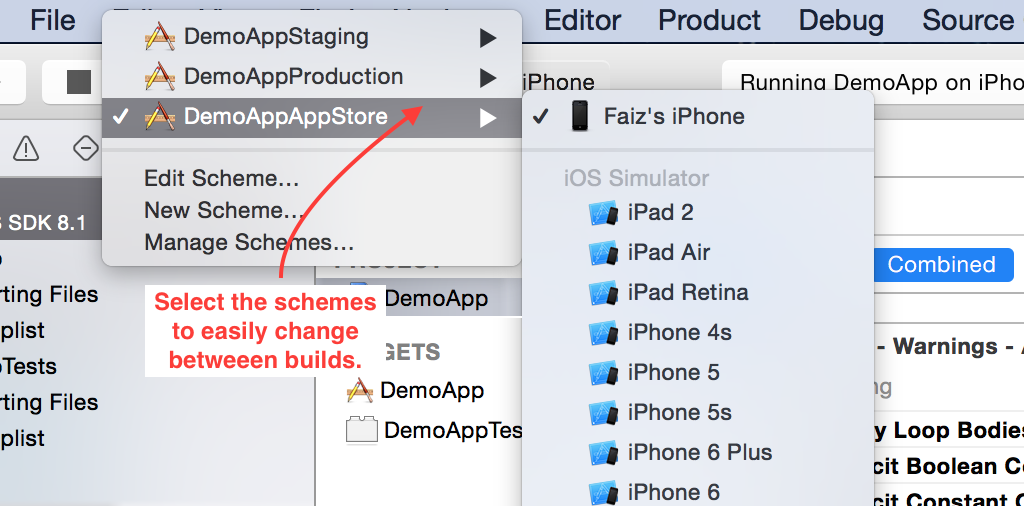 Select the schemes to change between different builds.[/caption]
Step 7: Define Preprocessor Macros
To easily switch the Base URL of API server, we can add a preprocessor macros to define the target's environment. For exampleSTAGING=1 for Staging schemes. To add the macros, search for Preprocessor Macros under the Apple LLVM6.0 - preprocessing section. Then add STAGING=1 in Debug Staging and Release Staging.
[caption id="attachment_6027" align="aligncenter" width="1838"]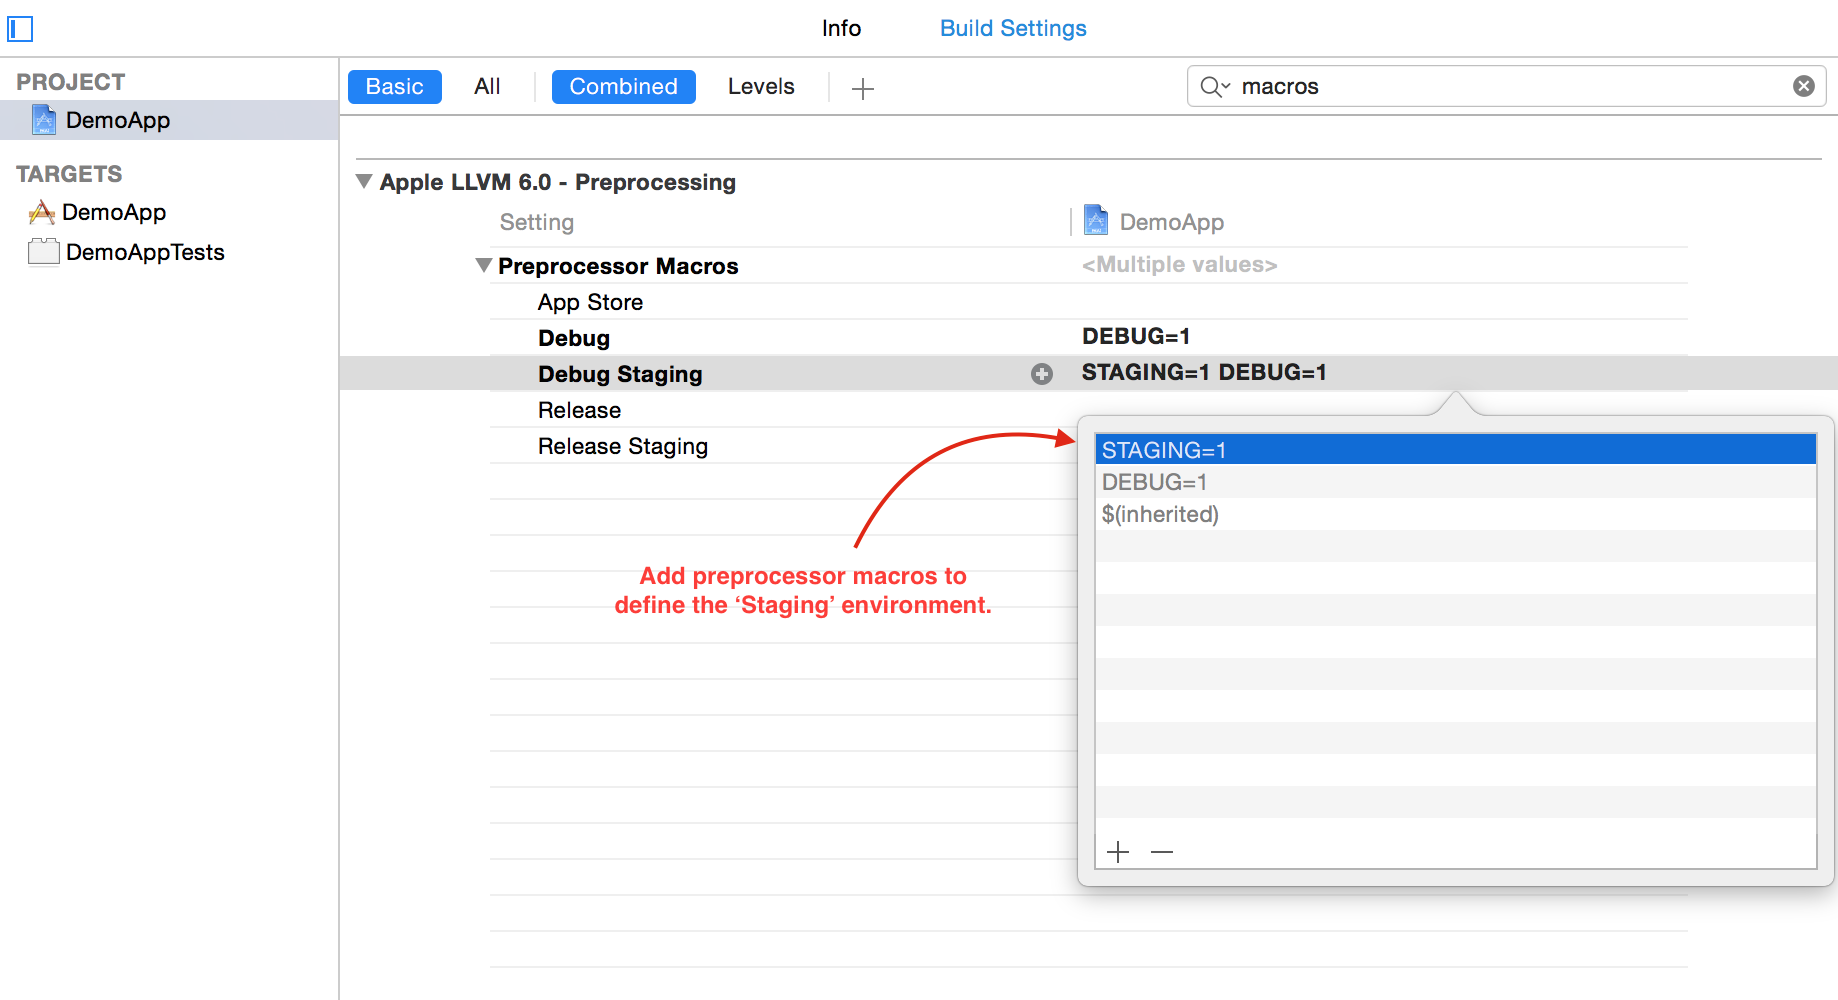 Add "STAGING=1" in Debug Staging and Release Staging.[/caption]
Finally, simply defines the Base URL as follows in Constant class or the project-Prefix.pch file, whichever one that fits your preferences.
https://gist.github.com/faizmokhtar/5470339f66dafbd22249
That's it. Now, you can switch between staging and production easily without having to manually change the parameters. If you have any questions or comments regarding this guide, feel free to post a comment below. Thanks!
Oh, and you can follow me on Twitter!
Add "STAGING=1" in Debug Staging and Release Staging.[/caption]
Finally, simply defines the Base URL as follows in Constant class or the project-Prefix.pch file, whichever one that fits your preferences.
https://gist.github.com/faizmokhtar/5470339f66dafbd22249
That's it. Now, you can switch between staging and production easily without having to manually change the parameters. If you have any questions or comments regarding this guide, feel free to post a comment below. Thanks!
Oh, and you can follow me on Twitter!Share this to